ビームサイズを調整する例
機械学習環境を個人用PCにセットアップする に続いて、 より加速器に近い例を示します。評価関数をどのようにすべきか、など、色々な テストにも使えますので活用してください。なにかの参考になれば幸いです。
GPyTorch + Ocelot でビームサイズ最小化
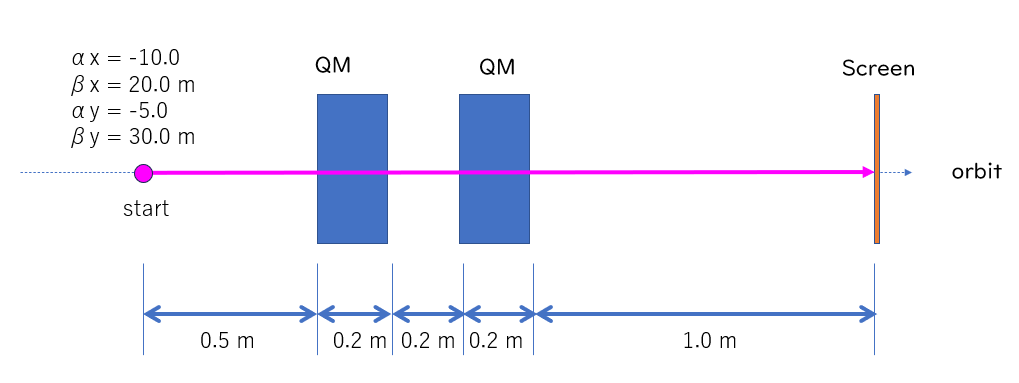
下図に示すようにQM2台でビームサイズを調整する例を考えます。 初期条件(Twiss parameter; α, β)は適当です。簡単のためディスパージョンηもゼロでスタートです。
実際の加速器ではQMの極性(QF/QD)が決まっていることが多いとは思いますが、 例としてバイポーラ電源がつながっていると想定します。
軌道計算
これくらいの例ならば自分で転送行列を書けば良いです。 ただし、今後の発展性を考えて、ここでは Ocelot を使います。 インストール方法はOcelotインストール方法を参照してください。
GPyOptによるビームサイズ最小化
コードをそのまま書きます。本当は適切にクラス化するべきですが、 この長さならベタ書きで分かると思うので分かりやすさ(?)優先で。
また、実際にはターゲットとなるビームサイズを定義する方が良いでしょう。
import GPy
import GPyOpt
import matplotlib.pyplot as plt
import numpy as np
import time

from ocelot import *

def calc_resp(x0, x1):
    ''' calc beam optics for 2 QM
    x0 : QM1.k1
    x1 : QM2.k1
    '''
    # Define Optics
    ## Drift
    L20  = Drift(l=0.2, eid='L20')
    L50  = Drift(l=0.5, eid='L50')
    ## Quadrupoles
    QM1 = Quadrupole(l=0.2, k1=x0, eid='QM1')
    QM2 = Quadrupole(l=0.2, k1=x1, eid='QM2')
    ## Lattice
    cell = (L50, QM1, L20, QM2, L50, L50)
    lat = MagneticLattice(cell, stop=None)
    ## Initial condition
    tws0 = Twiss()
    tws0.beta_x = 20.0
    tws0.beta_y = 30.0
    tws0.alpha_x = -10.0
    tws0.alpha_y = -5.0
    tws0.emit_x = 1.0
    tws0.emit_y = 1.0
    tws0.E = 1.0
    ## update optics
    lat.update_transfer_maps()
    tws = twiss(lat, tws0, nPoints=1000)

    idx = -1  # last point of the lattice
    sx = np.sqrt(tws0.emit_x * tws[idx].beta_x)
    sy = np.sqrt(tws0.emit_y * tws[idx].beta_y)

    return sx, sy, tws

def show_beta(x0, x1):
    sx, sy, tws = calc_resp(x0, x1)

    s = [p.s for p in tws]
    beta_x = [p.beta_x for p in tws]
    beta_y = [p.beta_y for p in tws]

    titlestr = "QM1.k1=%.2f, QM2.k1=%.2f, sx=%.3f, sy=%.3f"%(x0, x1, sx, sy)
    plt.plot(s, beta_x, 'b-');
    plt.plot(s, beta_y, 'r-');
    plt.legend(['Horiz', 'Vert'])
    plt.xlabel('s [m]')
    plt.ylabel('beta [m]')
    plt.title(titlestr)
    plt.grid(True)
    plt.show()

def eval_func(x):
    global cnt
    x0 = x[0][0]
    x1 = x[0][1]

    sx, sy, tws = calc_resp(x0, x1) # calc optics for 2 QM

    # Evaluation Function Examples
    val = np.abs(sx) + np.abs(sy)
    # val = np.abs(sx*sy)
    # val = np.log(np.abs((sx+10)*(sy+10)))
    # val = -1.0/np.abs((sx+10)*(sy+10))

    print("%d: %+8.3f,%+8.3f,%+8.3f,%+8.3f,%+8.3f"%(cnt, x0, x1, sx, sy, val))
    cnt = cnt + 1
    return val


# ==== Main =====
# GP Optimization
print("==== start ====")
print("# cnt, x0, x1, sx, sy, eval_val")
cnt = 0
bounds = [{'name':'x0', 'type':'continuous', 'domain':(-20, 20)},
          {'name':'x1', 'type':'continuous', 'domain':(-20, 20)}]

myBopt = GPyOpt.methods.BayesianOptimization(f=eval_func,domain=bounds,initial_design_numdata=10,acquisition_type='LCB')

myBopt.run_optimization(max_iter=50)
myBopt.plot_acquisition()
myBopt.plot_convergence()
print("Best     = ", myBopt.x_opt)

# plot betatron function
x0, x1 = np.array(myBopt.x_opt)
show_beta(x0, x1)
計算結果例1 : QF+QD に落ち着いた場合
計算結果例2 : スキャンする範囲を QD+QF に限定した場合
次のステップ
色々と変更して試すと良い
- ビームの初期パラメータを変える:簡単のためには円形ビーム(βx = βy )にして、αx=αy=0 にすると、もっと単純な形になる
- 解析解との比較
- 評価関数を色々変える:sx+sy, sx*sy, log(sx+sy+), -1/(sx+sy), ....ゼロ割に気をつけて適当なオフセットを入れると-1/((sx+10)*(sy+10)) とか....
- それぞれで最小値を見つける速度が変わる
- 単なるビームサイズだけではなく、他の条件(個々のQM k値を出来るだけ小さくするとか、途中のビームサイズを小さくするとか(betatron関数を小さくする))などを入れてみる
- 最小にするのではなく、設計値に設定する
- Optics的には Bendを入れてdispersionが入った状態にするとか、QMの数を増やすなど
- Ocelotで空間電荷効果を入れるとか、より実践的な形に→計算時間との兼ね合い
- 測定したビームサイズに意図的に「ノイズ」を入れて、GPの応答がどうなるかを確認する(重要!)
- GPのカーネルを変える
- 他のGPツール との比較
- 他の最適化手法(Nelder–Mead(downhill simplex)とか、最急降下法とか、遺伝的アルゴリズムとか)との比較、あるいは組み合わせを考える
- Grid Search との比較, Random Search との比較
おまけ
Optunaを使った場合。加速器機械学習フォーラムで話題になったので、久々に使ってみる。(以前には加速器学会2021の終わりに言及しただけで、そのときには結果を掲載していなかった。
有名なPrefferdNetworksのフレームワーク。
上と同じ例を、GPではなくTP(こちらがデフォルト)でサーチした場合の結果。 クラス化していないところは前と同じ(あまり参考にしてほしくない)
とはいえ、コピペで「とりあえず動く」という意味で掲げておく。
import optuna
from ocelot import *

def calc_resp(x0, x1):
    ''' calc beam optics for 2 QM
    x0 : QM1.k1
    x1 : QM2.k1
    '''
    # Define Optics
    ## Drift
    L20  = Drift(l=0.2, eid='L20')
    L50  = Drift(l=0.5, eid='L50')
    ## Quadrupoles
    QM1 = Quadrupole(l=0.2, k1=x0, eid='QM1')
    QM2 = Quadrupole(l=0.2, k1=x1, eid='QM2')
    ## Lattice
    cell = (L50, QM1, L20, QM2, L50, L50)
    lat = MagneticLattice(cell, stop=None)
    ## Initial condition
    tws0 = Twiss()
    tws0.beta_x = 20.0
    tws0.beta_y = 30.0
    tws0.alpha_x = -10.0
    tws0.alpha_y = -5.0
    tws0.emit_x = 1.0
    tws0.emit_y = 1.0
    tws0.E = 1.0
    ## update optics
    lat.update_transfer_maps()
    # tws = twiss(lat, tws0, nPoints=1000)
    tws = twiss(lat, tws0, nPoints=50)

    idx = -1  # last point of the lattice
    sx = np.sqrt(tws0.emit_x * tws[idx].beta_x)
    sy = np.sqrt(tws0.emit_y * tws[idx].beta_y)

    return sx, sy, tws

def show_beta(x0, x1):
    sx, sy, tws = calc_resp(x0, x1)

    s = [p.s for p in tws]
    beta_x = [p.beta_x for p in tws]
    beta_y = [p.beta_y for p in tws]

    titlestr = "QM1.k1=%.2f, QM2.k1=%.2f, sx=%.3f, sy=%.3f"%(x0, x1, sx, sy)
    plt.plot(s, beta_x, 'b-');
    plt.plot(s, beta_y, 'r-');
    plt.legend(['Horiz', 'Vert'])
    plt.xlabel('s [m]')
    plt.ylabel('beta [m]')
    plt.title(titlestr)
    plt.grid(True)
    plt.show()

def eval_func(trial):
    global cnt
    x0 = trial.suggest_float("x0", -20, 20)
    x1 = trial.suggest_float("x1", -20, 20)

    sx, sy, tws = calc_resp(x0, x1) # calc optics for 2 QM

    # Evaluation Function Examples
    val = np.abs(sx) + np.abs(sy)
    cnt = cnt + 1
    return val

# __main__
study = optuna.create_study(direction="minimize")
study.optimize(eval_func, n_trials=100)

print(f"Best Objective value: {study.best_value}")
print(f"Best parameter:  {study.best_params}")

# show_beta(x0, x1)
fig = optuna.visualization.plot_contour(study=study, params=["x0", "x1"])
fig.show()
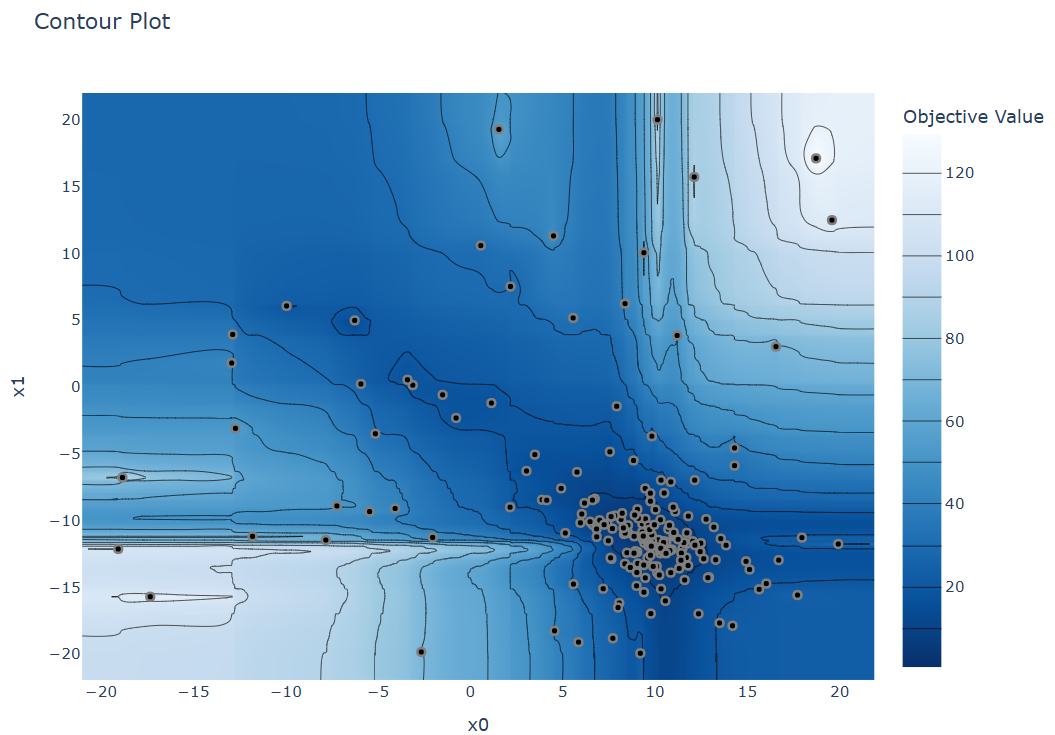
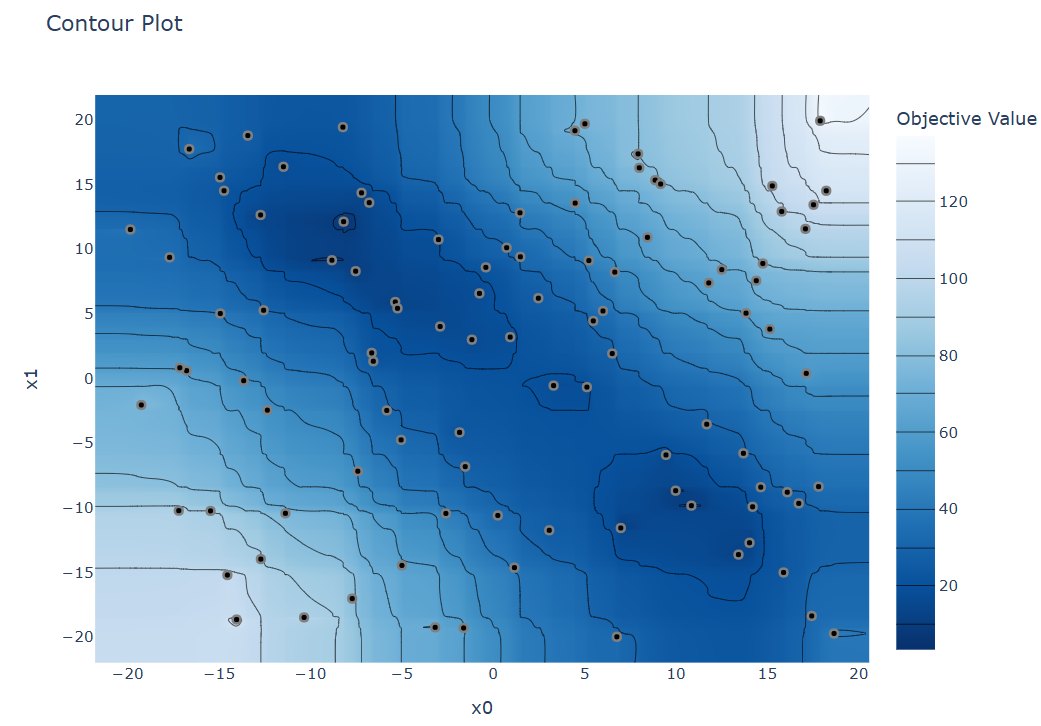
例えば、このような結果になる。
目的にもよるが、本来ならば2つのminimumがあるところ、完全に片側に寄ってしまう。
もちろん、初期のtrial数を増やすなどすれば少しはマシstuudy = optuna.create_study(sampler=optuna.samplers.TPESampler(n_startup_trials=50),
たまたま逆の谷に落ちたとき
TPEの代わりにGPを使えば、GaussianProcessぽい出力になる。内部ではBoTorchを使っている。sampler=optuna.samplers.GPSampler
結局は目的に応じて使う(速度優先、local minimum 回避優先など)のが妥当という結論に。 パラメータ重要度のプロットや、途中までの学習を呼び出すなど、いろいろと便利な機能はある。
多目的最適化をするため、ParetoFrontを出す目的にはとても便利。
Attachments (6)
- 2QM_layout.png (16.4 KB ) - added by 2 years ago.
- result1.png (199.4 KB ) - added by 2 years ago.
- result2.png (251.3 KB ) - added by 2 years ago.
- Pasted image 20240722231055.png (291.1 KB ) - added by 19 months ago.
- Pasted image 20240722231605.png (291.1 KB ) - added by 19 months ago.
- Pasted image 20240722231223.png (298.4 KB ) - added by 19 months ago.
Download all attachments as: .zip


